December 22, 2021  Expand to read article below Expand to read article belowJust a few short weeks ago, Waukesha, Wisconsin became international news and most of our customers are probably not aware our facility is in Waukesha Wisconsin. Some have been asking about recent events and the city. To the curious, we wanted to share a few words here even though it will not help with your C coding.
Waukesha is just a short distance away from the more known city of Milwaukee, but alike it is named from an Native American word for "fox". Other Native American cities in this area include Pewaukee - the home of professional football player JJ and TJ Watt, Oconomowoc and also in recent news, Kenosha. Waukesha sits atop dozens of natural springs, nicknaming us Spring City. In fact our street address is Spring City Drive.
The one claim to fame the city has used to market itself, is as the home of Les Paul, the first to make an electric guitar. There is a major road renamed to Les Paul Parkway, a middle school was renamed, and there are colorful extra large guitars decorating the city.
Waukesha started out very industrious and within the past few decades, the local community has transitioned to more residential. A fairly sizable city, but with a home town feeling of coffee shops, bike paths and many new retail areas. Waukesha can boast by having 100+ year old Carroll University, as well as a large Missionary college.
So, why is everyone asking where is Waukesha? Just before Thanksgiving this past November, a man drove a red SUV through a annual Holiday Parade. People of all ages were involved and over 50 people were taken to the hospital for varying injuries. Unfortunately, five people died, including one eight-year old child. The driver was in fact, just released out on bail, again, for trying to drive over his girlfriend just the week before. The community came together and people put blue lights on their homes to show support for those that lost ones in this tragedy.
Waukesha has also had some infamous crime, including the two young girls that repeatedly stabbed a third called the "Slender Man Stabbings." Both girls were sent to a mental hospital. One is now out on the way to college and the other is being evaluated every 6 months to figure out when she has been "cured." However, in this case, the victim survived.
When we go to shows and people find out where we are, the ones who have heard of Waukesha often times know the airport as being on the way to Oshkosh (yet another Indian name). Pilots from all over the world come to Oshkosh at the end of July for the Experimental Aircraft Association Fly-In. This a huge event and makes the airport the busiest airport in the world for one week. This past July we had a booth at the show to show case DC Power and Battery analyzer equipment made by our subsidiary company, West Mountain Radio. This is a spectacular event with over 100,000 visitors a day. You can walk right up to hundreds of all types of planes, watch an air show along the mile long show runway, or even buy a plane. The view of the aircraft parking lot is amazing with uniqueness and ingenuity.
Waukesha may have some good and bad notoriety, but it is still an excellent place to work to provide quality products to our customers. So, where is Waukesha? The question is why not Waukesha?
Like us on Facebook. Follow us on Twitter.
About CCS:
CCS is a leading worldwide supplier of embedded software development tools that enable companies to develop premium products based on Microchip PIC® MCU and dsPIC® DSC devices. Complete proven tool chains from CCS include a code optimizing C compiler, application specific hardware platforms and software development kits. CCS' products accelerate development of energy saving industrial automation, wireless and wired communication, automotive, medical device and consumer product applications. Established in 1992, CCS is a Microchip Premier 3rd Party Partner. For more information, please visit https://www.ccsinfo.com.
PIC® MCU, MPLAB® IDE, MPLAB® ICD2, MPLAB® ICD3 and dsPIC® are registered trademarks of Microchip Technology Inc. in the U.S. and other countries. | December 22, 2021 Expand to read article below Embedded computer systems has been our passion since 1992. We were first to release a C compiler for the PIC® MCU, after switching internally from the 8051. The C compiler was designed from the bottom up around the special architecture of the PIC® MCU. The PCB compiler supported the original four Microchip parts and the PCM compiler supported the one mid-range part they offered.
Microchip continued to develop new chips with additional features, and so did CCS to support these devices. Now we support over 1000 parts from 12 bit to 24 bit opcodes. We make powerful features available for even the smallest devices. We created unique built-in functions that the user would be able to migrate to new devices with ease and less programming time. We deliver tools that do not force our users into buying bigger, and more expensive, chips every time you want to do something more advanced.
As a software compiler developer we have a unique position in the marketplace for hardware development tools that work seamlessly with the IDE compiler. CCS develops tools exclusively for the Microchip PIC® MCU. We do not produce a watered down product that is available for dozens of chip manufactures. We intentionally do not try to shoe-horn an existing compiler engine into simply working for a PIC® MCU.
CCS has a team of embedded engineers that develop the compiler and use it to produce real world applications in custom projects. We produce products that do work in the real world as opposed to products that should theoretically work. Our custom customers are on the cutting edge and need us to be ready for new protocols. This also improves the compiler so we can support these new technologies and have built-in functions and examples for our customers. We are committed to producing a compiler that is easy to use for Software Engineers, Electronic Engineers and hobbyists alike. The emphasis is on using the rich set of built-in functions that operate across all PIC® MCU families.
Approximately 11 years ago, CCS took on another endeavor, in purchasing a company in the Amateur Radio field, called West Mountain Radio. This brand focused on radio accessories including interface units from the radio to a PC. CCS was able to augment some brilliant and very popular analog designs with microprocessors (PIC® MCU's of course) to take the product lines to the next level. For example CCS took a simple power distribution unit and added internet conductivity so the power distribution could be monitored and controlled from any web browser in the world.
As a company we continue to fully support and update the product lines from both companies. We appreciate all of our supportive customers and are always willing to listen to feedback.
Like us on Facebook. Follow us on Twitter.
About CCS:
CCS is a leading worldwide supplier of embedded software development tools that enable companies to develop premium products based on Microchip PIC® MCU and dsPIC® DSC devices. Complete proven tool chains from CCS include a code optimizing C compiler, application specific hardware platforms and software development kits. CCS' products accelerate development of energy saving industrial automation, wireless and wired communication, automotive, medical device and consumer product applications. Established in 1992, CCS is a Microchip Premier 3rd Party Partner. For more information, please visit https://www.ccsinfo.com.
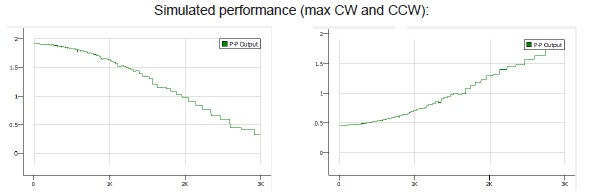
PIC® MCU, MPLAB® IDE, MPLAB® ICD2, MPLAB® ICD3 and dsPIC® are registered trademarks of Microchip Technology Inc. in the U.S. and other countries. | December 22, 2021 Expand to read article below This article gives an overview of how to implement a simple low pass and high pass filter for audio using dsPIC® processors. The example code implements a tone control pot. Center does not filter, and when turned counter-clockwise. the bass is increased and clockwise increases the trebble.
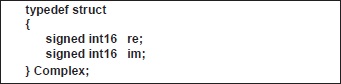
Our example uses a structure for each sample point that is a complex number. It has a real and imaginary part to allow other areas of the program that use them both. For our use we only need the real part.
The pseudo-code for a 3 pole filter looks like this:
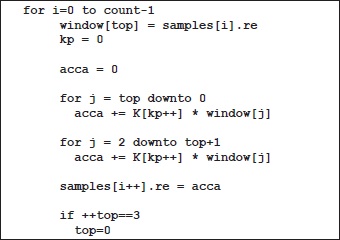
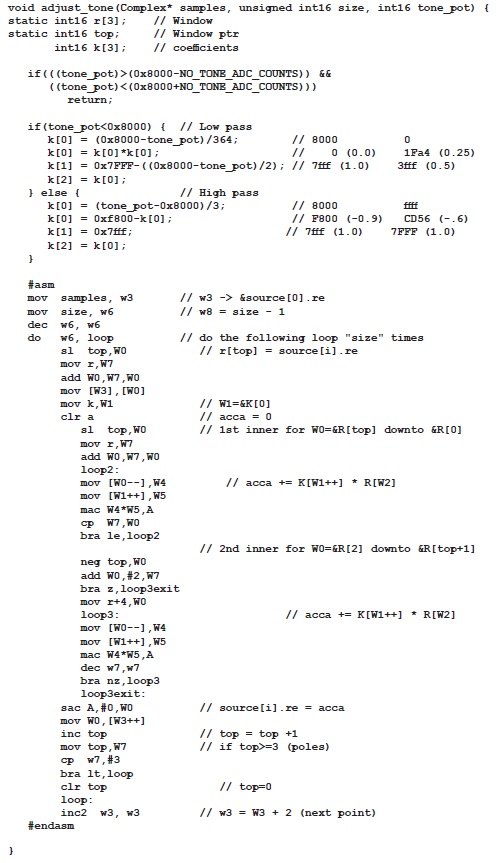
The algorithm uses a set of coeficient constants that determine if the filter is low pass or high pass and what the cutoff frequency is. In our example we want the constants to change based on the pot setting. These constants are based on a 8khz sample rate.
The acca register is a built in accumulator in the processors with a DSP. The DSP engine has a bult in instruction to help with code like "acca += K[kp++] * window[j]." It looks like this in assembly:
mac W4*W5,A
Notice in the assembly language how C variables are referenced. Pay close attention to when pointers are being used as opposed to straight values.
Like us on Facebook. Follow us on Twitter.
About CCS:
CCS is a leading worldwide supplier of embedded software development tools that enable companies to develop premium products based on Microchip PIC ® MCU and dsPIC ® DSC devices. Complete proven tool chains from CCS include a code optimizing C compiler, application specific hardware platforms and software development kits. CCS' products accelerate development of energy saving industrial automation, wireless and wired communication, automotive, medical device and consumer product applications. Established in 1992, CCS is a Microchip Premier 3rd Party Partner. For more information, please visit https://www.ccsinfo.com.
PIC ® MCU, MPLAB ® IDE, MPLAB ® ICD2, MPLAB ® ICD3 and dsPIC ® are registered trademarks of Microchip Technology Inc. in the U.S. and other countries. | December 22, 2021 Expand to read article below Since the beginning Microchip has been great at having stock of all processors, even very old ones. That has changed over the last year as many of you have found out. If you are reading this then you probably are a CCS C compiler user. The good news is with most programs it is very easy to change from one chip to another.
For example if it is hard to buy the popular PIC16F887 part, you may be able to find the PIC16F747 and that might work for your application.
In many cases the only change you need to make is changing:
#include <16F887.h>
To:
#include <16F747.h>
Then recompile and start up the production line.
Another bonus is the newer parts seem to have more features and they are a lower cost. For example a popular 8 pin part for many classic designs uses the PIC12F675 part. The newer PIC16F18313 part is 33% lower cost with double the memory.
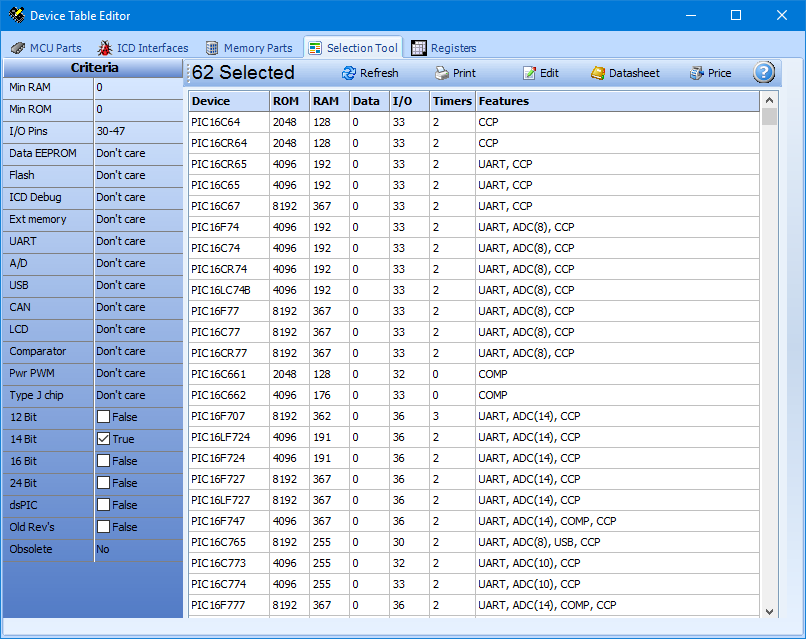
If you have the IDE compiler there is an easy way to find parts that might work as an alternative. Use TOOLS > DEVICE EDITOR > SELECTION TOOL
Then on the right side select the families (14 bit shown here) and the pin count range (30-47 shown here) along with anything else you want to filter by. The table shows the essential characteristics including the modules (like UART) included in the part.
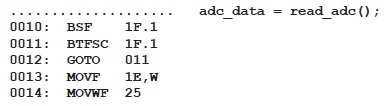
This works so well because of the compiler built in functions that are customized on the fly for the chip that is being compiled. For example the built in function to read the Analog to Digital converter, read_adc().
For the 12F675 you get:
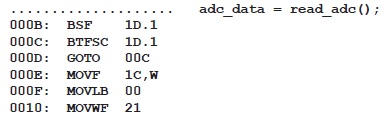
For the 16F18313 you get this with the same C code:
If you write directly to a register then you have have more trouble converting the code. For example on a PIC12F675 you might have a line like this:
#byte PORT_A = 0x05
Then you might do this in your code:
data = PORT_A;
For a PIC16F18313 the port A address is 0x0C so you could do this:
#byte PORT_A = 0x0C
Or better yet, to make the same code work on both chips:
#byte PORT_A = getenv("SFR:PORTA")
This only works if the SFR names are the same in both chips. You should also consider switching to built-ins by removing the #byte all together and in your code doing this:
data = input_a();
You can do a similar thing for bit names like this:
#bit TIMER_INT_FLAG = getenv("BIT:T1IF")
Be aware sometimes the bits, even with the same name, function differently on different chips. Taking some extra time to use built in functions can save you time in the long run.
Chips with the more advanced peripheral modules may have different options for the built in functions. It is usually easy to figure out the changes by looking at the device header in the section for the peripheral. The comparator is one module that changes a lot between chips. For example:
PIC12F675: setup_comparator( A0_A1 );
PIC16F18313: setup_comparator( CP1_A1_A0 );
Newer chips generally have new fuse settings. In general the compiler default fuses are good. You may want to review the fuses (VIEW > CONFIGURATION BITS) for the new part to make sure they are good.
If you use oscillator fuse settings we strongly recommend you remove them and use the #use delay() instead. That directive sets all the fuses and registers for the oscillator. These settings are very different between chips so using the #use delay() will make the code more portable. For example:
#use delay( crystal=8mhz, clock=32mhz )
Like us on Facebook. Follow us on Twitter.
About CCS:
CCS is a leading worldwide supplier of embedded software development tools that enable companies to develop premium products based on Microchip PIC ® MCU and dsPIC ® DSC devices. Complete proven tool chains from CCS include a code optimizing C compiler, application specific hardware platforms and software development kits. CCS' products accelerate development of energy saving industrial automation, wireless and wired communication, automotive, medical device and consumer product applications. Established in 1992, CCS is a Microchip Premier 3rd Party Partner. For more information, please visit https://www.ccsinfo.com.
PIC ® MCU, MPLAB ® IDE, MPLAB ® ICD2, MPLAB ® ICD3 and dsPIC ® are registered trademarks of Microchip Technology Inc. in the U.S. and other countries. | December 22, 2021 Expand to read article below The Microchip PIC® Microcontrollers (MCUs) have become the most popular choice for new 8 bit embedded designs. Other features include running at a speed of up to 280 million instruction per second, a low cost of some under $1, and large number of interfaces like USB, Ethernet and analog signals are useful features of PIC® MCUs.
The C programming language, originally developed by AT&T Labs by authors Brian Kerninghan and Dennis Ritchie, known as K&R C, became an international standard by ANSI in 1989. The C programming language syntax is the core of many newer programming languages. In 2003 a new standard derived from C defined the C++ language. C++ has some complex language elements that make it impractical for use on a microcontroller as opposed to a desktop PC. C is now the most popular language for programming microcontrollers and it is important for students to learn.
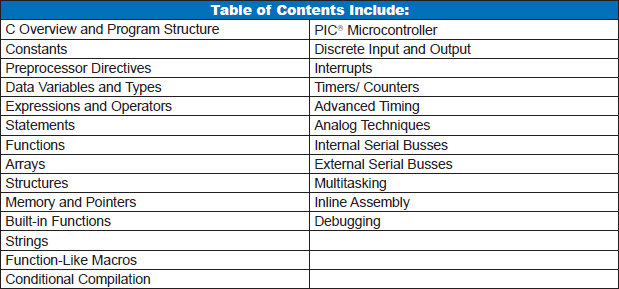
Whether you are an instructor looking to teach embedded C programming in a classroom setting, or a hobbyist looking to learn a new skill, Embedded C Programming:Techniques and Applications of C and PIC® MCUs by Mark Siegesmund is a great resource. It provides hands-on introductory concepts of C programming using PIC® microcontrollers with the CCS C compiler. The book demonstrates programming methodology and tools used by professionals in the field of embedded design by using a step-by-step approach. The writing is reader-friendly and the principles of the C programming language are introduced gradually. Each chapter builds on concepts introduced in the previous chapter, forming a strong foundation in embedded C programming.
There are endless possibilities in the field and the book encourages readers to alter, expand, and customize code for use in their own projects. The book focuses on real-world applications, programming methodology and tools, and best-practice techniques. Some other key features include:
* Each chapter includes C code project examples, exercises, and quizzes
* Tables, graphs, charts, references, photographs, schematic diagrams, flow charts, and compiler compatibility notes
* Publisher support and resources for educators
* Free Single-chip IDE Compiler for PIC18FK50 included with book purchase
The hands-on exercises in the book have been tailored to be used with the CCS E3mini development board. This board uses the PIC18F14K50 microcontroller. The board has a bootloader, so no device programmer is required to reprogram the board. Included is a USB cable that can send data to the PC for running the programs. Everything is included that you need to get started!
Chapter 3 example of an exercise:
1. Write a program that turns the green LED on for 10 seconds, the yellow LED on for 3 seconds, and red LED on for 10 seconds.
...
Chapter 3 example of a quiz question:
(3) What happens if a #define uses its own identifier name in the text of the define?
(a) This is the only way to get that identifier in the code post-preprocessor
(b) An error will be flagged on the #define line
(c) An error will be flagged where the define is used
(d) When the identifier is used it is turned into white space
(e) The computer hangs because it replaces the identifier with itself forever
CCS also has a Sensors Explorers kit. This product includes the E3mini Board, bunch of sensors and a tutorial book with examples for each sensor.
* Human Touch
* Temperature
* Light
* Barometric Pressure
* Humidity
* Accelerometer
* Magnetic Field
* Ultrasonic Range
* Vibration
* Sound
* Rotary Encoder
Included Output Devices:
* Full Color LED
* Generic Relay
* Stepper Motor
Also available to add on for additional purchase:
* GPS Unit
* 7-Seg LED
* Keypad
Learn more about our books here: https://www.ccsinfo.com/books.php
CCS provides many development tools in the world of embedded software, with our specialty being in embedded C programming for PIC ® MCUs. A variety of options for our famous C-Aware IDE compilers and Command Line compilers, custom engineering and consulting services, and personalized technical support, are just a few of the tools and resources we have to offer. Check out our website and dive deeper into the world of embedded C programming! https://www.ccsinfo.com
Like us on Facebook. Follow us on Twitter.
About CCS:
CCS is a leading worldwide supplier of embedded software development tools that enable companies to develop premium products based on Microchip PIC ® MCU and dsPIC ® DSC devices. Complete proven tool chains from CCS include a code optimizing C compiler, application specific hardware platforms and software development kits. CCS' products accelerate development of energy saving industrial automation, wireless and wired communication, automotive, medical device and consumer product applications. Established in 1992, CCS is a Microchip Premier 3rd Party Partner. For more information, please visit https://www.ccsinfo.com.
PIC ® MCU, MPLAB ® IDE, MPLAB ® ICD2, MPLAB ® ICD3 and dsPIC ® are registered trademarks of Microchip Technology Inc. in the U.S. and other countries. | October 14, 2021 Expand to read article below Back in 1995 the most popular web browser company in the world, Netscape, decided to use asymmetric encryption to allow people to safely enter credit card numbers in the web browser. Mathematicians started talking about asymmetric encryption in the late 70's. There are two keys, one to encrypt and a different one to decrypt. It is very difficult to figure out one key unless one has the other. This way a website can send an encrypt key to the browser and the browser can encrypt the data to be sent. Even if someone is able to see the encrypted data and the encrypt key, the data can not be decrypted without the decrypt key. Part of the magic involves very large prime numbers and complex equations.
That is not all the browser did for SSL (Secure Socket Layer, AKA https). This also created the idea where each SSL website would have a certificate issued by a trusted authority. That certificate indicates the web site domain is encrypted by the authority. The browser can decrypt the certificate to learn the verified name of the company that is running the web site. In this case, it is the encrypt key that remains secret. The idea was to prevent a user from being spoofed into entering their credit card on a web site that appears to be a well known site, but is not.
It is that second use that caught the eye of Microsoft in the XP days. They decided to use the certificate concept to add a signature to executable files loaded by Windows. It works like this: A software publisher gets a certificate from a trusted authority, the same people doing web site certificates. Using a tool from Microsoft, a signature using the certificate with the company name and a CRC of the executable file is appended to the file. When the OS loads the file, it can decrypt the signature, verify the CRC and decide how trusted the file is. For example if a message like "This program was published by CCS, Inc; if you trust that company press continue."
The only encryption algorithm used up to 2001 was called SHA1. In 2001 a new algorithm called SHA2 (AKA SHA256) came out that was considered harder to break with the newest fast computers. XP SP3 would accept either encryption but the older XP versions would only take SHA1. One could sign a file with two signatures, SHA1 and SHA256 and it would all work, so this became the norm.
Starting with 64 bit Windows 7 Microsoft began requiring all drivers be signed with a certificate traceable to an authority they approved of. The way these certificates work is company A can issue a certificate to you and they have a certificate issued by company B and they have one issued by company C. This chain of certificates is all part of the signature. Microsoft maintains a list of the large handful of top level certificate issuers it trusts. Drivers were considered sensitive because they often operate in kernel mode where they can access any memory in the PC.
With all the websites in the world a lot of companies were issuing a lot of certificates and some of these authorities were not doing much to check for who they were issuing them to. The concept of an Extended Validation certificate (EV) was created where it requires a great deal of verification to ensure the certificate holder is who they say they are. Microsoft uses this in their SmartScreen web browser download checker. It flags any software without a EV certificate as suspicious.
This was all well and good until the release of Windows 10 that first was sent out October of 2020. Microsoft decided drivers loaded into Windows would only be accepted if they were signed by Microsoft. The way this worked is the software publisher would first sign the driver with an EV certificate, then send it to Microsoft. If approved, the publisher signature was stripped and a Microsoft signature applied. They would then send the package back to the publisher. So the whole world did not grind to a halt, they have exceptions as a part of a roll out plan. In general, right now anything signed in 2021 needs a Microsoft signature and most older files are accepted.
So here come the headaches for CCS. First I should point out even though we have a yearly developer subscription with Microsoft we did not get the memo about this new rule. In the old days Microsoft published a newspaper sent via snail mail to all developers. The last one we got was October of 2000. For a while we got news by CD and then that was replaced with a slew of online blogs.
Microsoft does not update all machines at the same time, so early this year we started getting some calls of trouble but not enough to be very concerned. There seemed to be work-arounds that got people going. Only new drivers had a problem and only on machines that did not have the driver previously installed. The error did not say "Sorry this driver must be signed by Microsoft", it did say "Invalid signature hash."
We put in a support ticket with Microsoft in May and were then told about the new rules. Our first step was getting an EV certificate. We had been using the ordinary certificates (OV) since the beginning but never bothered with the EV. It then took over two months and a pile of tickets in attempts to log into the Microsoft driver signing website. The problem turned out to be another account with the same company name was taken out 10 years ago and not used since. The error was not "Company name already used", it was "Something went wrong, try again later." The next problem was our files were not being accepted. Another dozen tickets and we found out the reason our certificate was not working was the authorities started issuing SHA3 certificates and the Microsoft website could not handle those yet. Windows is OK with SHA3 but not the website that accepts the driver submittals. After making a special request for an SHA2 certificate and another couple of weeks to figure out what the special website wanted, we started getting Microsoft signed drivers.
So far we have not been able to figure out how to append additional signatures on to the files so it seems we need to have new and old style drivers depending on the OS.
Many of our customers are using USB CDC drivers to talk to the PIC® MCU. This creates a COM port in Windows that can use the normal serial API functions. The driver for a CDC device is just a .inf file with VID, PID and company information, plus the .cat file with the signature. In Windows 10 no driver is required for CDC devices. You do need it for older versions of Windows. If you do want to use a .inf for a CDC device in Windows 10 then it does need the Microsoft signature even though the driver file is optional.
It is possible to load a driver into Windows that has a bad or wrong signature. This link details the procedure:
https://www.howtogeek.com/167723/how-to-disable-driver-signature-verification-on-64-bit-windows-8.1-so-that-you-caninstall-unsigned-drivers/
The procedure will not work if you have secure boot enabled and on some PC's you need a password to disable secure boot. This also will not work on PC's that are in S-Mode. Only software products in the Microsoft store can be installed in S-Mode. This might be a hint that new rules for normal executable are coming.
Microsoft is evolving with encrypted certificates as are web browsers. If you ever try powering up a old PC you may find it can no longer browse the web because it uses an older encryption method and most websites are now the newest https. Asymmetric encryption technology can be used to send encrypted data to anyone you have not previously made secure contact with. It is finding use in a large variety of applications. One big use, that would not otherwise be possible, is cryptocurrency.
We are sorry for the inconvenience to customers who were trying to use our products during this adventure (nightmare). Many customers were able to use the above workaround and others returned product out of fear of damaging their system. We are now back to normal and everyone should be able to install our drivers.
Like us on Facebook. Follow us on Twitter.
About CCS:
CCS is a leading worldwide supplier of embedded software development tools that enable companies to develop premium products based on Microchip PIC® MCU and dsPIC® DSC devices. Complete proven tool chains from CCS include a code optimizing C compiler, application specific hardware platforms and software development kits. CCS' products accelerate development of energy saving industrial automation, wireless and wired communication, automotive, medical device and consumer product applications. Established in 1992, CCS is a Microchip Premier 3rd Party Partner. For more information, please visit https://www.ccsinfo.com.
PIC® MCU, MPLAB® IDE, MPLAB® ICD2, MPLAB® ICD3 and dsPIC® are registered trademarks of Microchip Technology Inc. in the U.S. and other countries. | October 14, 2021 Expand to read article below Ever wonder how much time it took to code and debug a project? The Project Watch utility within the CCS C-Aware IDE makes keeping track of project development easier than ever!
The Project Watch tool provides the user detailed log information on the current working project. Time-management can be viewed through either a 'Daily Activity' log, including total editing and debugging time, or 'Specific Activity' log containing time the specific activity occurred.
Long periods of time where the keyboard is not used are excluded from the times.
View logs, contained in the Project Watch tool by selecting between two view modes: 'Selected Date(s)' or 'All Entries'. The 'Selected Date(s)' view shows the log information for the currently selected day(s) on the calendar. The 'All Entries' view shows the entire log that has been collected for the project, including a summary of the log and detailed information separated by each day.
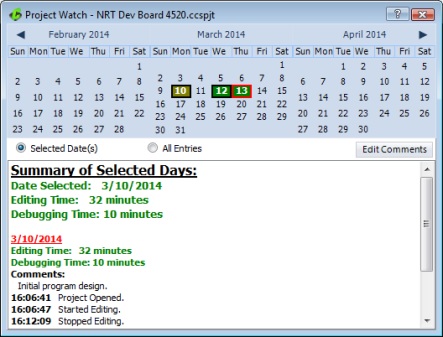
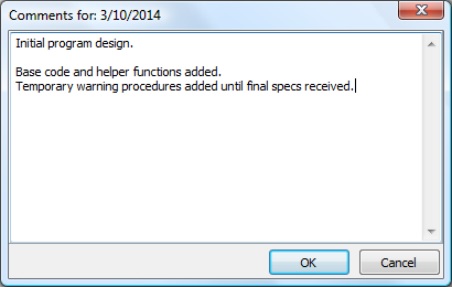
Additionally, comments can be added or modified to a Project Watch log from a pop-up menu by right-clicking on any date that contains log information. Any changes to the comments will be saved to the project log and displayed in the log information window.
The Project Watch feature is available under the 'View' ribbon in the IDE. 
Like us on Facebook. Follow us on Twitter.
About CCS:
CCS is a leading worldwide supplier of embedded software development tools that enable companies to develop premium products based on Microchip PIC ® MCU and dsPIC ® DSC devices. Complete proven tool chains from CCS include a code optimizing C compiler, application specific hardware platforms and software development kits. CCS' products accelerate development of energy saving industrial automation, wireless and wired communication, automotive, medical device and consumer product applications. Established in 1992, CCS is a Microchip Premier 3rd Party Partner. For more information, please visit https://www.ccsinfo.com.
PIC ® MCU, MPLAB ® IDE, MPLAB ® ICD2, MPLAB ® ICD3 and dsPIC ® are registered trademarks of Microchip Technology Inc. in the U.S. and other countries. | October 14, 2021 Expand to read article below Do you maybe have a lot of projects named "main"? How about one source base that through conditional compilation could produce any one of six hex files? Maybe you just need to know exactly what version the hex file for a project is from? This article describes the technique to get specifically named hex files, different from the project name.
The fundamental principle is to use #export to define the name of the hex file. The simple syntax is:
#export(file="myproject.hex", hex)
You need to give it the filename and the format (hex). This alone can help a lot for many situations.
The next example shows how to include a version in the hex file name:
#define FW_VER_MAJOR 1
#define FW_VER_MINOR 14
#define strzz(x) #x
#define strz(x) strzz(x)
#export(file="myproject_" \
strz(FW_VER_MAJOR) "." strz(FW_VER_MINOR) ".hex" , hex)
The strz/strzz macros are used to convert the text define to a quoted string. In C, consecutive strings are appended together as if there was a single long string. The resulting filename for this example will be:
myproject_1.14.hex
Finally consider adding in the product name, that may be different based on conditional compilation. We will also show how to identify a release with diagnostics.
#if PRODUCT==PROD_WIZBANG
#define APP_NAME "WIZBANG" #elif PRODUCT==PROD_WIZBANG_PLUS
#define APP_NAME "WIZBANG_PLUS" #elif PRODUCT==PROD_SUPERBANG
#define APP_NAME "SUPER-BANG" #else
#error Unknown Product #endif
#ifdef DEBUG
#define HEX_TAIL "_diagnostic.hex" #else
#define HEX_TAIL ".hex" #endif
#export(file=APP_NAME "_" \
strz(FW_VER_MAJOR) "." strz(FW_VER_MINOR) HEX_TAIL, hex)
If you use the CCS IDE for development then the IDE will know the correct hex file name from the last build. Debugging and programming will work as expected.
Sometimes the filename is not enough. The compiler also allows you to put the same kind of information inside the hex file. For example:
#hexcomment\ APP_NAME _ FW_VER_MAJOR . FW_VER_MINOR
This can be done in addition to or instead of the custom hex filename. The directive puts a comment in the hex file that is ignored by the device programmer. The \ after hexcomment tells it to put the comment at the end of the file.
Without the \ the comment is put at the top of the file. The CCS device programmers will pop up any comments at the top of the file before programming. For example:
#hexcomment NOTICE: This file is only to be used for APP_NAME
This simple technique can be a powerful tool to properly identify your hex files.
Like us on Facebook. Follow us on Twitter.
About CCS:
CCS is a leading worldwide supplier of embedded software development tools that enable companies to develop premium products based on Microchip PIC ® MCU and dsPIC ® DSC devices. Complete proven tool chains from CCS include a code optimizing C compiler, application specific hardware platforms and software development kits. CCS' products accelerate development of energy saving industrial automation, wireless and wired communication, automotive, medical device and consumer product applications. Established in 1992, CCS is a Microchip Premier 3rd Party Partner. For more information, please visit https://www.ccsinfo.com.
PIC ® MCU, MPLAB ® IDE, MPLAB ® ICD2, MPLAB ® ICD3 and dsPIC ® are registered trademarks of Microchip Technology Inc. in the U.S. and other countries. | August 31, 2021 Expand to read article below Almost every new PIC® microcontroller Microchip has released in the last few years has a peripheral called the Peripheral Pin Select (PPS) peripheral. This peripheral is used to assign what pins are used as the peripheral pins for most digital peripheral. This means instead of a specific pin or pins that has to be used with a peripheral you can choose the pin or pins to use with it. This is very useful on low pin count devices were a single pin would have had multiple peripheral functions on a single pin causing you to choose which peripheral to use. The way the PPS peripheral works for peripheral pins that are outputs, the UART TX pin for example, the peripheral is assigned to the pins, and for peripheral pins that are inputs, the UART RX pin for example, the pin is assigned to the peripheral. Because of this it's possible to assign multiple pins to the same output peripheral, but only one pin can be assigned to an input peripheral.
To assign a pin as a peripheral pin the CCS C Compiler has several methods to do this. The primary method is the #pin_select directive. The #pin_select directive is a preprocessor directive used to assign pins at compile time. The format for the #pin_select directive is as follows:
#pin_select xx=yy
With xx being the peripheral to assign the pin to, see the PIN_SELECT section of the device's header file for a list of the peripherals pins can be assigned to, and yy being one of the pin defines in the device's header file. The following is an example of how to assign the UART1 TX and RX pins using the #pin_select directive:
#pin_select U1TX=PIN_C6
#pin_select U1RX=PIN_C7
However not all pins can be assigned as a peripheral pin, to determine which can be assigned under the PIN_SELECT section of the device's header is a list of pins that can be assigned as peripheral pins. Additionally not all valid pins can be assigned to every peripheral, some device only allow certain port pins to be assigned to a specific peripheral were as some other devices only allow some pins to be assigned as input peripheral pins. This is device dependent and the device's data sheet should be checked carefully when laying out the peripheral pins for device with a PPS peripheral. The #pin_select directive does have checks to make sure a pin can be assigned to a peripheral, and will generate a compiler error if a pin can't be assigned to a peripheral or if the pin isn't a remappable peripheral pin.
Another method the CCS C Compiler has for assigning pins as peripheral pins is the pin_select() function. The pin_select() function can be used to assign pins at run time. This is useful in cases were more then one pin needs to be assigned to a single output peripheral, if a single pin needs to be used by multiple peripherals or if the pins assignments need to changed, for example, in a case were the code needs to support multiple hardware configurations. The format the pin_select() directive is as follows:
pin_select("xx", yy, aa, bb);
With xx being the same peripheral names used by #pin_select and yy being one of the pin defines in the device's header file. Additionally aa and bb are optional parameters used to specify whether to do or not to do the unlock and lock procedures, TRUE does the procedure and FALSE doesn't to the procedure. With aa specifying the unlock procedure and bb specifying the lock procedure. When the aa and bb parameters are not specified in the function call the lock and unlock procedures are both performed by default. These optional parameters are most useful when using the pin_select() function to assign multiple peripheral pins sequentially. For example, the following is an example of of how to assign the UART1 TX and RX pins at run time:
pin_select("U1TX", PIN_C6, TRUE, FALSE);
pin_select("U1RX", PIN_C7, FALSE, TRUE);
Another useful feature of the pin_select() function is that it can be used to unassign the peripheral pins. The format of the function call depends on the whether unassignment is for an output peripheral or an input peripheral pin. To unassign an output peripheral pin the following format is used:
pin_select("NULL", yy);
With yy being the one of the pin defines in the device's header file. To unassign an input peripheral pin the following format is used:
pin_select("xx", FALSE);
With xx being same peripheral names used by #pin_select. For example, the following is an example of unassigning the previously assigned UART1 TX an RX pins:
pin_select("NULL", PIN_C6, TRUE, FALSE);
pin_select("U1RX", FALSE, TRUE);
The final method has for assigning the peripheral pins is some for the #use directive can make the peripheral pin assignments, the #use pwm() directive, for example. For #use directive that this is supported with the format is similar to the following, see the help file entry for the #use directive for the exact format:
#use pwm(CCP1, output=PIN_B0)
The above will make the assignment of PIN_B0 as the CCP1 output pin. This method is currently not supported by all of the #use directives, currently only the #use pwm() and #use capture() directives support this feature. For the other #use directives #pin_select should be used to assign the peripheral pins before the #use directive line. The #use rs232() is an example were the pins should be assigned using the #pin select directive before the #use rs232() line if the hardware UART pins are to be used on a PPS device were the UART pins are remappable peripheral pins. Without the assignments the compiler will implement a software RS232 instead. For example, the following will assign the UART1 TX and RX pins and setup the RS232 to use the hardware UART peripheral:
#pin_select U1TX=PIN_C6
#pin_select U1RX=PIN_C7
#use rs232(xmit=PIN_C6, rcv=PIN_C7, baud=115200, stream=U1_STREAM)
Like us on Facebook. Follow us on Twitter.
About CCS:
CCS is a leading worldwide supplier of embedded software development tools that enable companies to develop premium products based on Microchip PIC® MCU and dsPIC® DSC devices. Complete proven tool chains from CCS include a code optimizing C compiler, application specific hardware platforms and software development kits. CCS' products accelerate development of energy saving industrial automation, wireless and wired communication, automotive, medical device and consumer product applications. Established in 1992, CCS is a Microchip Premier 3rd Party Partner. For more information, please visit https://www.ccsinfo.com.
PIC® MCU, MPLAB® IDE, MPLAB® ICD2, MPLAB® ICD3 and dsPIC® are registered trademarks of Microchip Technology Inc. in the U.S. and other countries. | August 31, 2021 Expand to read article below The latest version of Windows, Windows 11, will be rolling out to the public in the near future. Here is what you need to know in order to take advantage of the newest version of the OS while continuing to use CCS, Inc. products.
Most PCs on the market right now will be able to support Windows 11. For those that want to know if their current PC is supported, Microsoft has released the minimum system requirements for installing Windows 11 which are as follows:
* Processor with a clock speed of at least 1 GHz and has 2 or more cores
* At least 4 GB of RAM
* 64 GB of available storage
* UEFI and Secure Boot capable
* A graphics processor that is compatible with DirectX 12 or later (This can be checked by typing dxdiag into windows search and running the preinstalled app)
* A high definition display (720p) with a screen that is at least 9"
* Trusted Platform Module (TPM) support (Most computers that meet the above requirements and are less than five years old will support TPM)
The majority of PCs that were manufactured in the last few years should meet these requirements. Most of these system requirements are geared towards increasing security on the new OS, partially achieved by preventing older hardware from running Windows 11. Microsoft plans to release tools to help determine hardware eligibility once Windows 11 is widely available.
Windows 11 brings new features and a sleek new look while still functioning very similar to Windows 10 which will make the transition fairly simple. The new Windows includes new features like Widgets and Snap layouts and Desktops. Android apps will also be making an appearance in the new OS.
The Start menu returns in Windows 11, which can be accessed in the middle of the Taskbar. It still includes the ability to search for installed apps as well as view an alphabetized list of apps, just like Windows 10. The new Start menu will be very recognizable to those upgrading from Windows 10.
The new snap layouts feature allows for easier and more predictable window snapping. This allows users to better utilize their screen space for multitasking purposes. Desktops also make a return to Windows 11 allowing users to maintain multiple desktops, allowing for separation between work, school, or personal desktops.

The Widgets feature is a new way to view news and information in Windows 11. Widgets can be curated to show you personalized content, news and info that you want to see. The Widgets button is located on the Taskbar and can be hidden if desired, allowing users to choose if they want to take advantage of this feature.

Windows 11 will be introducing Android apps to your PC. Microsoft is planning to allows users to display Android apps in the Microsoft store and download them through the Amazon Appstore. Using common mobile apps on your PC will be an interesting new feature for Windows that Microsoft plans to implement later this year.
For our customers that make use of the CCS C Compiler as well as our programmers/debuggers, there should be little to no difference going from Windows 10 to Windows 11. Microsoft has committed to maintaining compatibility between Windows 10 and 11, this means that the CCS C Compiler will install and run without the need for any extra changes.
This also includes our USB drivers for CCS programmers/debuggers and other software tools. This will allow customers to continue programming Microchip PIC devices on Windows 11 with the same hardware and software they currently use.

Windows 11 preview builds can be installed by becoming a part of the Windows Insider Program. The Insider Program is free and it's a great way for excited Windows users to try out the new OS and check out its new features ahead of time. For those who want to wait, Microsoft plans to begin rolling out upgrades to Windows 10 users in early 2022.
Windows 11 brings a new sleek and clean redesign to Windows while still keeping much of the functionality of the previous Windows 10. Most users should find an easy transition to the new version and should find compatibility with all the apps they are used to using on Windows 10. For the CCS customers that are looking to upgrade, the switch should be fairly easy while allowing you to continue using CCS products.
Like us on Facebook. Follow us on Twitter.
About CCS:
CCS is a leading worldwide supplier of embedded software development tools that enable companies to develop premium products based on Microchip PIC ® MCU and dsPIC ® DSC devices. Complete proven tool chains from CCS include a code optimizing C compiler, application specific hardware platforms and software development kits. CCS' products accelerate development of energy saving industrial automation, wireless and wired communication, automotive, medical device and consumer product applications. Established in 1992, CCS is a Microchip Premier 3rd Party Partner. For more information, please visit https://www.ccsinfo.com.
PIC ® MCU, MPLAB ® IDE, MPLAB ® ICD2, MPLAB ® ICD3 and dsPIC ® are registered trademarks of Microchip Technology Inc. in the U.S. and other countries. |
|


